Showing posts with label niece. Show all posts

Thursday, June 25, 2015

From My Bench ~ Modelling Photo Shoot and then some ice cream...

 
https://www.etsy.com/ca/shop/WildWomanJewelry/search?search_query=elastic+bracelets&order=date_desc&view_type=gallery&ref=shop_search
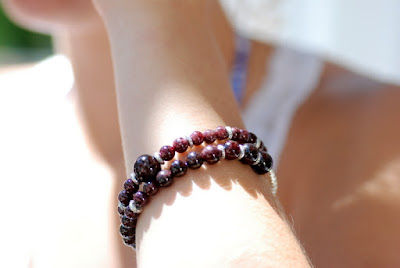
Yesterday we had a perfect first of summer, school's out afternoon.  My niece and her best friend were hanging out at the lake, mostly at my house :), and they are both beautiful so I asked if they wanted to do some modelling for me.  They agreed - yippee! We wandered around the yard snapping pics of them wearing most of my latest creations. It was a lot of fun and resulted in some great shots!
Thanks ladies!
https://www.etsy.com/ca/shop/WildWomanJewelry/search?search_query=elastic+bracelets&order=date_desc&view_type=gallery&ref=shop_search
https://www.etsy.com/ca/shop/WildWomanJewelry/search?search_query=elastic+bracelets&order=date_desc&view_type=gallery&ref=shop_search 
https://www.etsy.com/ca/shop/WildWomanJewelry/search?search_query=elastic+bracelets&order=date_desc&view_type=gallery&ref=shop_search
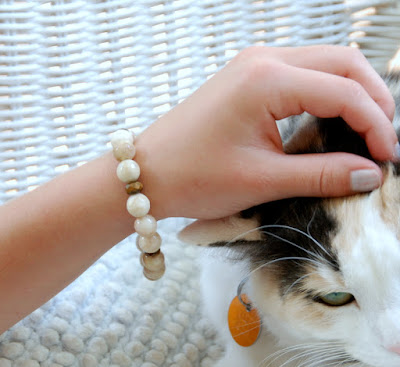
Naturally, little miss Ethel had to make an appearance!
https://www.etsy.com/ca/shop/WildWomanJewelry/search?search_query=elastic+bracelets&order=date_desc&view_type=gallery&ref=shop_searchhttps://www.etsy.com/ca/shop/WildWomanJewelry/search?search_query=elastic+bracelets&order=date_desc&view_type=gallery&ref=shop_search
https://www.etsy.com/ca/shop/WildWomanJewelry/search?search_query=elastic+bracelets&order=date_desc&view_type=gallery&ref=shop_search
 and then we went for ice cream!!!
(click on any of the photos to see all the stone bracelets available in the shop :)

Monday, September 15, 2014

Somewhere Over the Rainbow

  
  When I got my ukulele in June, one of the first songs I wanted to learn to play was Somewhere Over the Rainbow, a long time favorite and perfect, in my opinion, for the ukulele.  Sophie was keen too - we initially thought she would play her guitar but she loved the ukulele and had played a bit in music class at school (isn't that fantastic!?).  So, within a few days, she had one too - hers is bright green! The best parts have been the time we spent together learning and several resulting fun and silly, after dinner, impromptu family sing-alongs - such a hoot!

Anyway, we did it! We can both play it and if I do say so myself, we sound pretty good together.  She wasn't here to make this little video (we may do another on Thanksgiving weekend as proof) but here is me with a shortened version.  And, most importantly, I am sparing you my singing voice, but rest assured, I'm singing most enthusiastically in my mind~ enjoy!


Tuesday, August 26, 2014

Summer Crafts { and not much baking :) }

Water 'Paint' Balloon Paintings
This is just what it sounds like - water balloons filled with paint thrown at a canvas!
This was a hoot...we began with tempera paint (too watery), moved to food coloring (much better) and added acrylic ink mixed with a bit of water (the best!)


Vintage Fork Hooks
Soph was keen to make some hooks for hanging clothes in her bedroom.  She noticed some in the garden shed I had made from vintage cutlery and wanted to give it a go.  She hammered and twisted the prongs and then bent each fork using the vise on our workbench and a hammer. Spray painted in turquoise, yellow and white to match her room and drilled by hubs for mounting on the wall, she is happy and so is her mom! 

Glow Bubbles
We did a Google search to investigate the best way to create glow bubbles.  Squeezing the ink from neon highlighters and mixing it with the bubbles was said to be very effective so we decided to give that a try as well as using regular glow sticks. The highlighter 'squeezing' was messy - wearing plastic gloves is highly recommended.  We used pink, yellow, orange and green and just poured the ink right into the bubbles.  For the glow sticks, we activated them, screened out the bits of glass and poured the color in the bubbles as well.
 (Even though it is non-toxic, we suggest this be done by an adult due to the bits of glass.)
Off to the lawn we went to create our garden of bubbles.  The inks seemed to make the surface tension of the bubbles stronger and they landed and lasted all for ages.  The amount of 'glow' was pretty but less than we hoped for... the next day, in the light, the colors were fantastic!! 
 

Saturday, August 9, 2014

Summer Crafts and 'Baking'

Our most recent projects include making a string of punched tin lights for the Bunkie and trying every popsicle recipe we could find!

Tin Lights
1 string of mini lights
25 tin cans (we raided the recycling for ours - thankfully, being summer, there was not shortage of beer cans to round out the number we needed :)
hammer and nail


I removed the top of each can and gave them a good cleaning.
Sophie found it easier to just jab the can with the nail.

We used a flat screwdriver to punch the end hole where we inserted the lights - this took a while (a couple of rainy afternoons. We also pressed the tin on the inside back against the light sockets to secure them.  Here you can see our progress.
Helpful Hint: Be SURE the lights work before you attach the cans! 
 
This is the finished strand on our kitchen counter (nice wavy panorama :).

And the final installation in the Bunkie -
they look fabulous!!
 
Sprite and Gummy Bear Popsicles
1 can of Sprite
1 package of gummy bears
popsicle mold
* open Sprite and let it go flat overnight in the fridge
* we put three gummy bears in each mold and filled with Sprite
* freeze
These have been quite popular and we've made them twice so far!
 
Jello Popsicles
We found a recipe that promised no dripping for these popsicles.  Unfortunately, they tasted awful!
So, here is our plan for the next time ~
You'll need:
*boxes of Jello (each makes about 5 popsicles)
*fruit juice, lemonade or koolaid
*equal amounts of water
Make the Jello following the instructions on the box. 
Substitute juice for half the water required. 
Boil it to be certain all the Jello powder dissolves.
We used Dixie cups and wood sticks for the molds -
pour Jello mixture into each cup,
let set, add stick and freeze.
Enjoy!
 
Ideas for our next projects include Glow Bubbles, whipped cream waffle cones and water balloon splat paintings! I'll keep you posted...


Tuesday, July 22, 2014

Summer Crafts and Cooking ~ Week 3

 
Sophie was away at camp and on a little road trip over the past week so we just made one delightful dessert before she left. These chocolate cookie peanut butter cup 'stacks' were rich but delicious!!
 
Ingredients:
1 package chocolate cookies (we used oreos)
12 small peanut butter cups
fondue chocolate
* twist open the cookies (use the frosted sides of two cookies as the 'sandwich')
* place one peanut butter cup in the frosting and top with the other side of the cookie.
* dip in melted fondue chocolate
* let chocolate sandwiches set in the fridge until after dinner!

 
She's back and we are ready to create again today!


Monday, July 7, 2014

Summer Crafts and Cooking ~ Week 2

This week's projects included making these fun rainbow pictures with melted crayons and chocolate cake 'ice cream' cupcakes. 

Crayon Rainbows
1 small art canvas
I box crayons
hairdryer
glue gun
glue sticks
Crayon Art  
 Fun and so easy! Line up the crayons along one edge of the canvas and then using a hot glue gun, glue each in place. Stand the canvas and heat crayons with the medium/high setting on your hair dryer.  We recommend covering your work surface with plastic or newspaper because the wax splattered a bit before we got the hang of melting the crayons :) Sophie hung hers in the Bunkie and mine is on my desk in my office - they are so colorful!!


The hotter setting melted the crayons much more quickly and resulted in this cool mixed rainbow effect.  Also, Sophie grouped her colors together so the brights really make a gorgeous impact!

 "Ice Cream Cone" Dessert
Baked 'Ice Cream' Cupcakes
1 chocolate cake mix
1 can frosting
cupcake papers
muffin pan
1 box ice cream cones
Line the muffin pan with the paper liners.  Mix up the cake mix as per the instructions on the box and pour batter into the little cups. Place cones right in the batter. Bake at 350 degrees for about 30 minutes...check with a clean wooden pick to be sure they are finished.  It took longer than we thought it would :)
 
 
Remove from the oven and let cool. Frost and decorate as desired.  They were a bit messy but yummy and everyone loved them for dessert!
 
 
We've got great plans for this week ... and yes, chocolate is involved.
happy summer
xo

Wednesday, July 2, 2014

Summer Crafts and Cooking - Week 1

Ingredients and Supplies
1 box of fondue chocolate
4 bananas
1 box of Smarties
strawberries
paper straws
When I was a kid, we spent summers at the cottage.  I went armed with more ideas, kits and supplies for summer projects than the local craft store had on the shelves.  My niece, Sophie, who spends her summers here at the lake as well, is the same. The only difference is the main component of anything she is interested in is primarily chocolate. She has been scouring Pinterest and Instagram for DIY projects for us to tackle throughout this summer. We've been selecting two at a time (can you guess which one she picked?) and this week's choices were chocolate covered bananas (hint: do NOT freeze these) and colorful glow jars.
Supplies
6 small canning jars
2 packages of glow sticks
glitter
They were both simple and fun to make!
Chocolate Covered Bananas - Melt the chocolate in the microwave following the instructions on the box. Insert the paper straw in the banana and swirl it around in the melted chocolate.  Decorate with candy or sprinkles. We set them on a plate and found placing them in the refrigerator for about 30 minutes cools them but doesn't make the bananas mushy - YUM! We finished off the chocolate on some fresh strawberries! Our second project (my choice because I thought if they worked out, they would make a cool summer table centerpiece) was these pretty little glow jars. Simply cut open the glow sticks (the package says they are non-toxic but we were careful not to spill them as they will stain your work surface) and pour the contents in the jar.  We used two in each jar for lots of color. There is a little glass tube inside the stick so be sure not to break it until you put the cap on the jar. Add glitter in the colors of your choice, cap the jar and give it a good shake.  Here is a little video so you can see what happens~ it's a hoot! I'm definitely going to make more for our next outdoor BBQ!
Have fun and I'll let you know about the next two creations!
         

Saturday, July 28, 2012

Wild Child Rings are NEW!

In recent months, my niece, Sophie, has become increasingly interested in jewelry making and design. She's created some pretty wire wrapped beach glass pendant necklaces and loves to make earrings as gifts for our family and friends! She also an aspiring entrepreneur. The other day she was playing with some wire and made a fun and funky ring using some cool and colorful beads from her stash.  I thought it was fabulous and that perhaps others would too!  We made a deal {she gets a cut :)} and here we go -- Wild Child rings are inspired by her original design, made by me and are now available at Wild Woman Jewelry! We hope you like them! 

Wild Child rings are individually made with tarnish resistant silver coated heavy gauge copper wire, carefully selected fun and whimsical glass and lucite beads, and finished with playful spirals. Each ring is uniquely one-of-a-kind!